Saturday, December 21, 2013

happy winter solstice - free winter word art!

Happy Winter Solstice everyone!

I have a special affinity for December 21 not only because it's my birthday  :-)
but more importantly I love taking time on the Solstice to reflect on the quiet and stillness of winter, and the promise of things to come.

The evergreens laden with snow.

Buds appearing on deciduous trees, ready to burst forth in the Spring.

Quiet walks on crisp mornings.

Like no other time of the year, that feeling that I'm a part of nature. And that it's a part of me.

For me this is joy.

So I wanted to capture this in some custom word art that I could print and hang in our home to keep me in tune with this feeling.

And because you're awesome, you can click here to download a free PDF copy.  It's 8.5" x 11" with approximately 1/4" margin all the way around so if you plan to frame it, a thin frame works best.

Enjoy this very special Winter Solstice day.


Friday, December 6, 2013

the reimagined wreath - chandelier style!

[add fresh greens to an old wreath, embellish and hang from the chandelier].
This year I was determined to do something different with my decorations and I've been thinking of new ways to display wreaths.

So I have this old wreath that I drag out every year and this year I looked at it and thought "oh boy this thing's about on it's last leg..."

But it has a great frame so I figured it was worth keeping around a little longer.  But how to give it a new life?
Hmmm I said. Hmmm again. Staring, staring, getting nowhere.

Ah! Cup of coffee will help. Brief intermission...

Got it! Let's start with some fresh cedar branches.

Monday, September 9, 2013

perfectly portland - Columbia River Gorge sternwheeler cruise.

it's September and to me, this is hands down the best time of year to go sightseeing in Portland. the weather is cooling down and for the next few months, the city has been returned to it's residents.

one of our favorite things to do is take the sternwheeler cruise down the Columbia River Gorge. The Gorge is the incredibly beautiful dividing line between Oregon and Washington.
[columbia gorge sternwheeler]
every year between May and October, the Columbia Gorge Sternwheeler offers cruises up and down the Columbia River, expertly narrated by the captain.

what could be better than a couple of hours lazing down the river with a fascinating history lesson thrown in?
[the wheel. natch].
we start off heading West, downriver to pass under the stunning Bridge of the Gods...
[bridge of the gods].
there's a wonderful Native American legend that tells the story of the Bridge of the Gods.
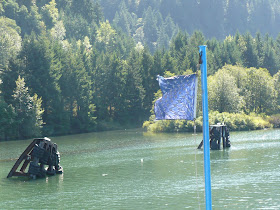
[columbia river].

there are so many amazing vistas along the river, and the trees stretch out to eternity.


once we hit the Bonneville Dam, it's time to head back upriver.
there is a Landmarks cruise where you actually get to pass through the Bonneville Lock...that would be so fun!
[heading back up river].
further upriver we pass by the wonderful Skamania Lodge, on the Washington side of the river. shortly after is the turnaround point to head back to the dock at Cascade Locks.
[skamania lodge].

another perfectly Portland day.

Wednesday, September 4, 2013

halloween diy - containing the eek!

this halloween decoration idea couldn't be simpler! more simple? the simplest.

my project was inspired by this great Better Homes and Gardens idea.

first gather yon supplies:
[3] footed hurricanes
[3] flower frogs*
[3] pieces of pearly white cardstock, each printed with a single letter
[1] package dried moss
[assorted] decor to place around the hurricanes

*take a moment or 10 to stare into space and wonder why that thing is called a flower frog.
give up and keep moving.
[flower frog].
I scored my footed hurricanes at a ridiculous clearance price at Michael's but you can buy them at nearly any crafts store or the wonderful HomeGoods. flower frogs  and moss were also from  Michael's, in the floral supply aisle.

gently break the moss into the desired size and place it in the bottom of the hurricanes.
slot each letter into it's flower frog. try again to figure out why it's called a frog.

shake the cobwebs from your brain [or place them in the hurricane! it's Halloween after all] and lower each letter into the hurricane.

wonder how your nice table got those scratches. probably because you're always plopping stuff on it to take pictures.

add desired decor around the feet. I placed some multi-color ceramic pumpkins and amber beaded garland.  I tucked a silver skeleton statue behind and I was done!

it's a simple vignette with lots of layers and texture.

Monday, August 26, 2013

painted summer series - part 2: crates.

I've been madly painting everything in sight so I've dubbed this the Painted Summer.

did you catch series 1?...an old dresser got a lovely new life my favorite dry-brush technique.

as if there weren't enough items and rooms in my house painted in grey-blue [sorry dear], I attacked some old crates with the same color, Benjamin Moore's wonderful Oxford Gray.
[crates are wonderful for storing dishes for a party].

here's what they looked like before:
[the before].
fine, but nothing magical. in fact I dragged these out of the garage every year for Fall decorating on my front porch. I put little hay bales in them and stacked pumpkins on top. but after Fall ended, they wound up back on their sad shelf in the garage.

after many years they heaved a big sigh, rolled their eyes, and told me they needed a face lift.
they claimed they wanted to spend more time with me.

out came the Benjamin Moore Oxford Gray and my inexpensive paintbrush that I use for crafts. no need for my wonderful Purdy brushes on this project...

I slapped those crates silly with paint. they loved it.
[hello Oxford Grey. I adore you].
a few of the letters got a little gloppy with paint. a quick retrace with my trusty Sharpie and they were back in black.
[Sharpie to the rescue!]
I re-adore these crates so much that I found a home for them in my newly repainted/redecorated/reorganized pantry.

personally I think they'll love being front and center all year round...

Friday, August 23, 2013

summer's last hurrah.

summers here in the pacific northwest are blessedly short and cool. we're now nearing the end of august. by this time, there is a marked change in the sun's angle and as the shadows start to deepen, my hydrangeas begin their inexorable creep into shades of green and pinky-brown.

and yet, there's always one or two blooms that are late to the party...blissfully unaware that time is indeed marching on.
(last blue hydrangea standing 23 august).
this year there was just one hanging on to the glory days. and of course it's a more riotous shade of blue than nearly all of the other blooms this summer. doesn't care a whit that all of its mates are winding it down for fall.
(winding up the summer).

nature has a lovely sense of humour.

Monday, August 19, 2013

halloween diy - spooky chandelier on canvas.

who's getting fired up for Halloween besides me?

a little rooting around in my unused Halloween decorations unearthed a vinyl chandelier wall decal. it's been rolled up in a tube for a couple of years so I finally decided to do a little somethin' somethin' with it.

a little more rooting and I discovered an old artist canvas that I bought on clearance and never used.

eureka!

a match made in heaven.
[spooky + lovely halloween canvas].
out came my never-ending wee sample can of Benjamin Moore Oxford Gray.
I swear this is going to be all over my house and yet the can will never be empty!

using my super-lazy super-easy dry-brush technique [does she ever do anything else?!] I quickly brushed the paint on the canvas, leaving some of the original white showing through for contrast.
[canvas paint prep].
after the paint dried, I used a craft spray adhesive on the back side of my chandelier and placed it on the canvas, then laid a piece of parchment paper on top to protect it.

next came a stack of heavy hardback books [Dick Francis to the rescue, hooray!] to help with the adhering process.
[dick francis to the rescue! helping with adhesive].
it was so tempting to keep peeking at the canvas to see if the chandelier adhered, but I was good reasonably good at leaving it alone to do it's thing.

success!

out came some thick craft wire, a fuzzy spider [eek!], and an upholstery tack. I nailed the tack to the top of the canvas, wrapped the wire around it, then did my favorite twist-around-the-pencil trick on the wire  so I ended up with a coil throughout.  wrapped the other end around the spider...
[adding the spider with coiled wire].
and voila!
[the finished product again].
it's possible that I'll be able to wait till at least mid-September to put this lovely scene on the mantel.

no promises!

Thursday, August 15, 2013

bidding our Portland summer adieu.

it's mid-August here in Portland Oregon and my thoughts are inexorably turning to my all time favorite season, Fall.

but I can't do that till I bid summer a proper goodbye...

here in the Pacific Northwest, we're so lucky to have a gorgeous forest playground just 1 hour away, high in the Cascades.
[incomparable Mt. Hood, view from Timberline Lodge].

huh. while I'm super pleased with my picture of Mt. Hood, it sure doesn't look very tall! but it's over 11,000 feet. must've been my angle...

but I digress. wasn't I talking about summer and how lucky we are?
and we felt doubly lucky this summer because two of our cool nieces came to visit, one for a week and one for a whole month!

now I should start by saying that these girls don't necessarily love being dragged all over the place...so naturally the first thing we did was pile everyone in the car and drag them out to Skibowl at Mt. Hood for some summer fun. oops, sorry girls.

Monday, August 5, 2013

organizing the kitchen pantry - progress.

have you ever counted how many times you go in and out of your kitchen pantry every day?

no? hmm. maybe that's just me.
[the inspiration, all from HomeGoods]

I must open that door a million times a day. and while there was nothing inherently wrong with it [it's chock full of nice built in shelves and a great wood floor]... the walls were basic builder's cream paint and it wasn't very organized or pretty.  the husband would argue that it doesn't need to be pretty.

c'mon son. you know better than that.

I feel like I say that a lot around this house...

so one day I decided to pretty-ify it.  of course that meant taking everything out and piling it in the dining room, taking special note of how many gross expired items were in there. old gross stuff, meet garbage can.

Monday, July 22, 2013

nurturing my Threshold crush.

Over the last year or so I've developed a crush on the Threshold home line at Target.

Couple that with my oh so serious crush of all things grey, blue/grey, or anything in between, and Threshold's Fall line is resulting in a lot of swooning over here.

Have you seen this great half-round storage cabinet? It's a beautiful grey wood covered in a special glaze to give it an antique vibe:
[lovely grey with antique finish].
It totally reminds me of the tables my grandmother had in her living room when I was growing up. She stored games and cards in hers.

And I'd love to swing that big round door wide and marvel at how a table could have round doors.


I could see this in an entryway, or as a game storage table just like Grandma had.


She also had some great fully round end tables with doors that swung open...I'm sad that I didn't take them when she offered them to me. Short-sighted much? Yep.


Not to be outdone, check this terrific apothecary cabinet!
[grey wash apothecary cabinet].
It's kinda genius because the first row is 3 individual apothecary drawers like you'd expect. But the bottom 2 rows are full size drawers that look like individual little drawers.  Genius! Because let's face it, lots of teeny little drawers aren't necessarily functional for everyone...this seems like a cool compromise to me :-)

Ok this last one isn't grey...
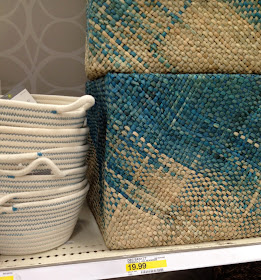
[seagrass milk crate].
...but who could resist those lovely blues mixed with natural tan? You wouldn't believe how pretty and soft these natural seagrass milk crates are.

They're a perfect size for storing just about anything. I was thinking they'd be perfect for storing winter scarves since they're soft and so the scarves shouldn't get snagged.

I think at least a couple of these lovelies are going to find themselves a home with me.

Can you tell I'm excited for Fall?

Monday, July 15, 2013

perfectly portland - summertime marionberry picking

Oh to be in Portland now that marionberry season is here....

I'll let you in on a secret. Portlanders are seriously proud of [and not to mention crazy about] their local magical blackberry hybrid known as the Marionberry. A native Oregonian, it was developed at Oregon State University in 1956, it's a cross between two blackberries and it's pure heaven!

[marionberries and blueberries. yum!]

So as you can imagine, no summer in Portland is complete unless you've been marionberry picking [or blueberry, or raspberry or whatever floats your boat...for me it's always and forever marionberries!].

[marionberries]

Last weekend we joined some friends at the beautiful Blueberry Hill Farm in Sherwood, Oregon. The wonderful staff at the farm gave us shallow boxes [marionberries don't like to be squished] and directed us to where the marionberries were planted. They're at the back, high point of the farm so we got to meander along a lovely lakeside path to get to them.
[lakeside path to the marionberries]

We picked like crazy for an hour or so.
I just couldn't stop. It's possible I overdid it.

But that's ok, when I got home I separated out about a gallon's worth, rinsed and tucked them into the freezer. I'll bring those out this winter when I'm seriously jonesing for them and probably make some great muffins.

I confess that I did manage to pick a bucket of blueberries too:
[blueberries too]
[at the entrance to the farm...don't just love hay rolls?]

Bumping along the farm road on the way out, I had my husband snap a shot of these hay rolls. I just love seeing these every year in the fields around our house. But I usually don't catch them when they're stacked so this was a lucky shot.

So what's in season in your neck of the woods?


Monday, July 8, 2013

a beautiful reclaimed window gets a new life

I'm a sucker for old windows. Really, almost any kind of old window will do.

More years ago than I care to admit to, my husband and I were shopping in the amazing Architectural Salvage store and I fell in love with the masses of reclaimed windows filling the store. They have lots of other goodies too but the windows...oh the windows!

I was well and truly hooked. I named my favorite window Sally, after Sandra Bullock's character in Practical Magic. She so reminds me of the kitchen in the aunt's house.

Fast forward 17 years and I've still got the lovely old windows we purchased in my Portland Oregon home.  For the longest time, I had Sally leaning against a wall. And she looked great.

But she had a dream of swaying gently above the fireplace...or hanging above the entry into the kitchen...or...
I went back and forth over where she'd live and the years passed, and she stayed put leaning against the wall in resignation, knowing one day the wait would be over.
We finally gave Sally her home over the fireplace in the front room. This room gets the west sun so she gets to sparkle a lot. As she deserves.

I'm sorry to confirm that yes, she has some broken panes. She survived all these years with all of her panes intact, then a few weeks before we hung her, I foolishly had her leaning in that fireplace area and she fell. I'm trying to convince her that she's more charming this way but I don't think she's having it.
I tell her that if she had all of her panes when the sun hits her full blast each afternoon, it would reflect too much and blind everyone. She just gently shakes her head at my lies.

supplies
The supplies were simple, all from our home away from home [pun intended], Home Depot.
1. two E-Z Ancor Self-Drilling Drywall Anchors [we always stock these in the garage, super useful!]. Sally only weighed a few pounds but we still used the 75 pound anchors. I certainly didn't want her to fall and lose any more panes!  Always err on the side of being safer and more secure I say.
2. two screw hooks
3. about 3 feet of chain, purchased by the foot. HD has many by the foot chain options.
4. two turnbuckles [side note: I actually wanted these just for looks but they came in very handy in the end]
the process
1. first we decided how far forward she should hang. You can see how silly and deep that area is and I wanted to be able to put seasonal decorative items in front of her but I didn't want her so far back that she got lost in the shadows. So we found a happy compromise about 1 foot back from the front edge.
2. next we drilled 2 of the white E-Z Ancors into the ceiling
3. then we screwed the 2 eye hooks into the E-Z Ancors
4. next came the chain looped onto the eye hooks
5. next came the turnbuckles. I mentioned I wanted these just for looks but they actually came in very handy in the end for leveling the window. see how they twist on each end?  we were able to make minor adjustments to the leveling by screwing each end...genius!
6. and finally...Sally was looped onto the open end of the turnbuckle. she already had nice bulky closed screw eyes [she obviously was displayed like this in her past life as well], but we could've easily added those if necessary 

Here she is again, isn't she lovely?


PS. As I was writing this, I searched the interwebs for more reclaimed window pics for you. Check this great post from the wonderful Eclectically Vintage on repurposing windows: 10 Unique Repurposed Windows

Sunday, June 23, 2013

painted summer series - part 1


I've been madly painting everything in sight lately so I am dubbing this the Painted Summer.

But I'm getting ahead of myself.


Let me tell you about this dresser I have. I do believe this is where my paint fixation began. When I bought her in the early 90s, she was the height of style...dark red mahogany.  And shiny. Blinding in fact; she was shellacked within an inch of her life.

Did I mention it was the early 90s?

But she had great lines and her size was just right.

So a few years ago, we whipped out the orbital sander and started by taking off that shiny finish, which was surprisingly easy. Another couple of passes with the sander and most of the dark red was gone too.

Swell. Now what?

We decided a 2-tone dry brush paint job was just the ticket. I dearly love the dry brush technique because it's meant to be messy and hasty looking. And that's just my speed.


I daresay we should've primed the girl first but we didn't. The first coat was a beautiful grey blue from Benjamin Moore called Oxford Grey. On top of that we dry brushed a very light coat of a grey lavender that I'm ashamed to say I didn't take note of. The closest is Benjamin Moore's Angel's Wings [awww].

A little leftover white from the garage was roughly rubbed into the crevices especially along her lovely Queen Anne's feet and around the scroll appliqué at the dresser's bottom.
[adore those feet].

A quick trip to the local architectural salvage store to pick up some mismatched pulls and keyhole and we were all set!
[yea that's a fake keyhole!]
I wish I had a picture of her in her previous life so you could see how much happier she is...she's so relaxed and chill now.